The Clone Stamp Tool
The Clone Stamp Tool is used to copy pixels from one place on a layer to another, from one layer to another, or from one document to another.
To remove part of an image that is distracting, yet keep the background coherent. For example, you want to keep the image of a laptop, but remove the hand over the laptop. To do this, duplicate the layer, then select the hand, delete it, and with the Cloning tool, recreate the rest of the laptop that was removed with the hand.
Fine Retouching
For fine retouching, use short, small brush strokes (only a single click if possible), and change your source often. This will avoid repetition of detail.
- To heal blemishes from a face. When the healing
tool doesn’t work, you can remove blemishes, scratches, dirt, or any small
problem areas by using a blemish-free area as your source.
- To merge one image or layer with another, creating artistic montages or collages.
A Note about Consistency
To maintain a consistent color, lighting, saturation and look within your image, always try to use a source as close as possible to your destination. For example, if you are removing a blemish from a face, try to find a clean area of the face that is very close in location to the blemish, and use a brush size just big enough to cover the blemish. If possible, click only once over the blemish to remove it.
The Options bar: The Cloning Tool uses all the available brush presets, brush parameters, blend modes, and opacity percentage. To size your brush quickly, use the ([) key to reduce or the (]) key to enlarge the brush size by 10 pixel increments.


The Flow option allows you to build up brushstrokes where they overlap, and where you mouse down without moving the cursor. 100% means you will brush exactly what you see without any buildup. 10% will lay down a very transparent brushstroke, and build up the image the longer you hold your mouse down.
The Airbrush icon will ensure you have a blurred edge, instead of a hard-edged. This creates softer painting, and is good to use when trying to fade the edges into areas of your image.
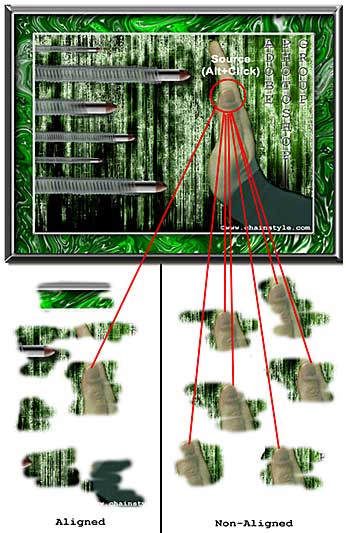
The Aligned option will line up the source with the destination. When this option is unchecked, it will always use the same source each time you lay down a new brush stroke. Each time you paint, you will paint the exact same area around the source. With the option checked, each time you lay down a stroke, the source will move along with your destination. No matter where you paint, you will be painting a duplicate of the entire source layer (see image above).

Use All Layers: This option will use all the layers in your image as a source when cloning. This means you don’t have to merge all your layers before you use the tool, and you can use an empty blank layer for your destination (which I would recommend).
When you lay down a single brushstroke, the clone stamp paints from the original image as it appeared before you started cloning. For this reason, there may be a visual inconsistency between what you are actually painting and what you see within your image. If this occurs and you didn’t expect it, undo your last stroke and try again. As soon as you start a new brushstroke, the clone stamp will re-evaluate the image and all the previous cloned strokes will be copied in subsequent brushstrokes.
Generally, I would keep the tool set to "Aligned" with a Flow setting of 100% and Opacity at 100% when trying to perform realistic retouching jobs. Also use a soft edged brush and/or keep the airbrush option turned on. This will create a more convincing image.
Avoid Repetition
For larger areas that need to be fixed, change your source often, and use small brush strokes. Visually, your eyes are always drawn to areas of repeating patterns. If the source of your image is not changed enough, repetitive patterns will form, and the cloning will be noticeable.