Pre-Photoshop CS Fibers
This tutorial will show you how to create a few different "Fiber" patterns before the advent of the "Fibers" filter in CS. As many of you know already, I think the new version of Photoshop is terribly lacking in substance, and what we the public got was a lot of smoke, without any meat on the grill. So to prove this point, I’m making it a mission to provide a few tutorials that aim to show you just how hoodwinked we were. In fact, I aim to show you that you can do most anything that CS has to offer in Version 6 and 7 (in fact you can probably go back even further and do these tricks in versions prior to Photoshop 6, but for the sake of argument, I’ll go back 2 versions and show you some variations that CS proclaims to be advancements. To start, here are a few techniques to create Fibers in Photoshop 6 and 7, without the use of the dreaded CS "Fibers" filter.
Now, don't get me wrong. I do like the Fibers filter in CS (Located under Filter -> Render -> Fibers), it's just that I don't think it's anything new or exciting because I've been creating patterns like this since version 6. And I'm just not all that impressed when I'm sold things I already have in the toolbox.
That being said, let's get started and create some Fibers. For reference, I'm using Photoshop 6 the whole way through, and the only CS screenshots are the comparisons at the end where I show the result of what the Fiber filter does next to my own Fiber creation (one I call the "Pre-CS Fibers".
Step 1
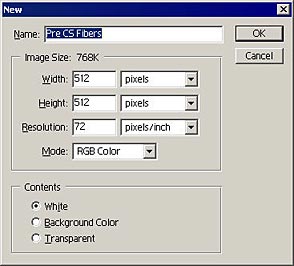
First, create a new document that is 512 x 512 pixels at 72ppi on a White background (as shown below):
Repeating a Random Pattern?
The reason I use increments of 512 pixels is because some filters (most notably the cloud and difference cloud filters) repeat every 128 pixels. Even though they create random patterns, they are always repeated over again after 128 pixels. This means that any increment of 128 will yield a perfectly repeatable pattern every time. So it’s good habit to create patterns that are multiples of this number, hence: 512 x 512 pixels.
Step 2
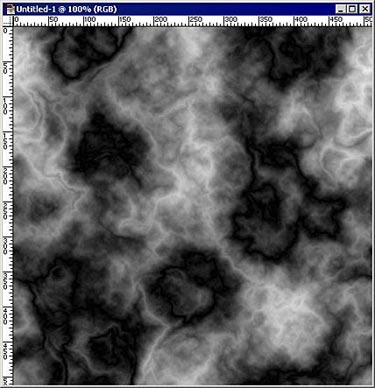
Next, let’s apply the Filter -> Render -> Clouds/Difference Clouds filters a few times (10-12 times is sufficient). Usually this is a standard starting point for many patterns. First apply the Clouds filter on a single layer, then duplicate the layer, and apply the Difference Clouds filter 10-12 times on the duplicate layer. Finally, merge this concoction down to a single layer (Layer -> Merge Down), and voila! You have an instant pattern starting point.
Automation! Automation! Automation!
I read an article once and some CEO of some large corporation had this to say: "If I can outsource it, I'm going to outsource it, and if I can automate it, I will automate it." Definitely words to live by. So why give yourself more hassle than you need? Create an action to do the work for you by recording all the previous Clouds / Difference Clouds steps and anytime you need a pattern, it’s just a single click away.
Step 3
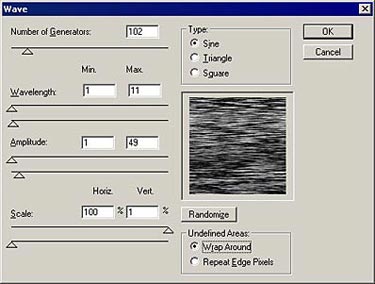
Next, let’s turn these blobs into flowing lines by using the Filter -> Distort -> Wave dialog. Enter the settings you see below. In order to make sure the lines go in a single direction, move the Vertical Scale down to 1% and leave the Horizontal Scale at 100%.
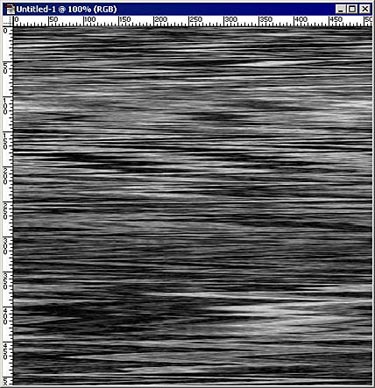
Our Fiber pattern is beginning to take shape. If you like the look of this pattern as it is, you don’t have to go any further. Leave this pattern as it is and use it anywhere a Fiber pattern is needed.
Step 4
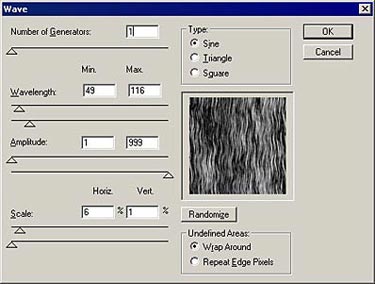
If you want to take it a few steps further, Start by rotating the image so that the lines are vertical instead of horizontal (Image -> Rotate Canvas -> Rotate 90 degrees clockwise). Then go back into our Wave filter dialog and enter some opposing settings by bringing the Scale down to 6% on the Horizontal axis. Enter the other settings below, and then apply them. This adds a slight wave that is opposite to the vertical bars and gives a more organic feel to the fibers.
Step 5
Let’s add even more organic aspects to our pattern by going into Filter -> Stylize -> Wind twice, and entering the settings you see here:
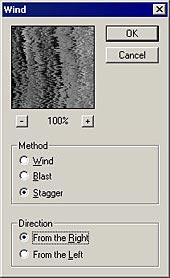
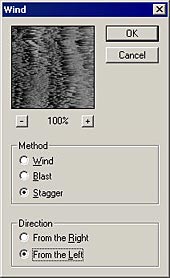
Notice that the only change you will need to make in applying your settings is switching the direction from Right to Left. This way, you get a rougher feel for your pattern. We will smooth it out a little in the next step. Be sure to apply the Wind filter once "From the Right", and then once again "From the Left"!
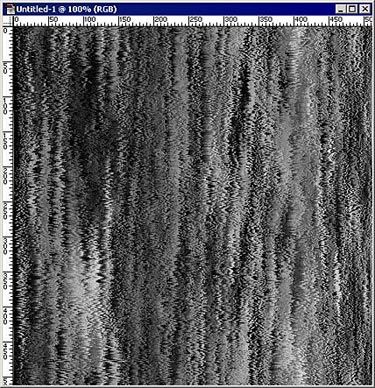
So far, you should end up with a pattern that looks similar to the following:
Step 6
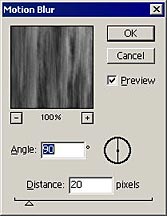
Next, enter the Motion Blur dialog (Filter -> Blur -> Motion Blur) and with the angle set to 90 degrees, add a distance blur of 20 pixels. This will smooth out the effects of the Wind dialog a little, yet still maintain a rough look for the pattern. Just enough to make it look like a true fiber pattern.
Step 7
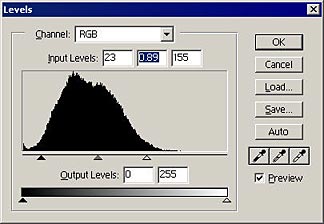
And finally, enter the Levels dialog box (Layer -> New Adjustment Layer -> Levels), or if you want a permanent level change, go into Image -> Adjustments -> Levels. Play around with the settings until you reach a desired contrast and brightness for the fibers you see on-screen.
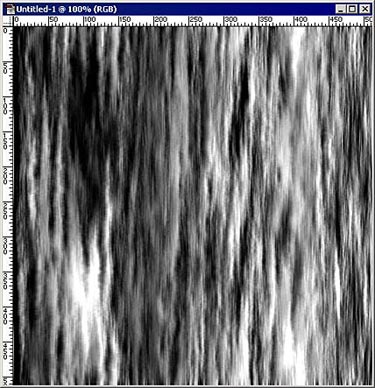
Here is our finished product:
Step 8
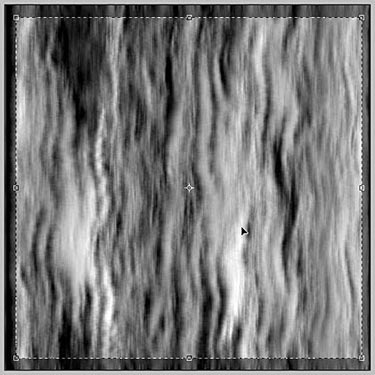
One last point. You may find that the result of the Wind dialog and Motion blur dialogs distort the edges of the pattern (making them erratic or all black). To get rid of these aberrant pattern filter artifacts, simply crop the image slightly on all four sides as shown below. The pattern will end up looking much more realistic and fibrous.
Now, let's compare our fiber patterns to the CS Fibers filter. First, remember our basic fiber pattern from Figure A above (See Step 3 above). Here are the settings to get the same result in the Fibers filter in Photoshop CS:
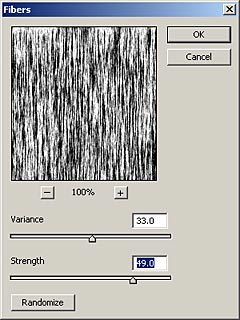
And next are the CS Fibers filter settings to achieve the Fibers that we created in Figure "B" above.
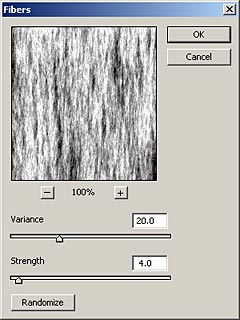
I think you'll agree that we've come pretty close to reproducing the same fibers you can find in the latest and greatest Photoshop CS. And this is only one method. You can also achieve similar results using the Filter -> Pixelate -> Mezzotint filter in previous Photoshop versions. But I'll leave that to your own imagination to think up alternate Fiber methods. For now, I hope this sparks some interest, and shows you that you don't need the latest and greatest software to produce some very exciting results.
See you next time, and good luck in all your Photoshop projects.