Resolution & Image Size
For most people, including a lot of Graphic Designers and Professionals in the Marketing industry, resolution and screen size are a mystery. Why? Perhaps it's because it relates to math and most of the Pixel Pushers. . . ahem, I mean Graphic Designers are more creative than logical-minded. Or perhaps it's just such a misunderstood aspect of creating digital files. Whatever the reason, unless you want to end up staring at the screen tearing your hair out because your wonderful work of art that took you 10 hours to produce on-screen looks like a blotched mess on paper, you need to understand two of the most crucial aspects to digital design: Resolution and Image Size (arguably Color would be one of the contenders for the top spot). This tutorial will focus on both of these issues and how it relates to the most basic of all aspects of Digital work: The Pixel.
Before I get into a discussion about each of these things, let's first define the terms.
Pixel: This is the basic building block of Bitmap images and Photos in the digital world. There is another kind of image that can be used in the digital world called a "Vector" Image, but for the purposes of this discussion we are going to deal with Bitmap images only. A pixel is a unit of measurement for the digital world.
Resolution: Now here's where it gets tricky. Resolution is a measurement of image detail. It is expressed as Pixels per inch (for Screen or Monitor) or dots per inch (in the Print world) or even samples per inch (if Scanning). Resolution can also be expressed in File size (in either Kilobytes or Megabytes) and has a direct relation to file size. It takes into account the image size (height and width) and the filte size, and is expressed by how much information or detail is stored in the image, and hence in the image file.
Image Size: Image size is a factor expressed as either Inches or Pixels per inch (resolution). And this is at the heart of our discussion.
Resampling: Sizing an image upward or downward, and letting the software either add pixel data into the image (upsampling) or cut pixels out of the image (downsampling)
The basic thing to keep in mind is that Resolution and Image dimensions (either pixels or inches) make up the image size (file size that is). When you are determining what settings to use to get the image into the computer (via an input device like a camera or a scanner, you must specify 2 things: the image dimensions you want (either in pixels or in inches) and the proper resolution. For most cameras, you don't even need to specify the resolution, because they are mostly set for a resolution of 72 pixels per inch. This is a double-edged sword however, because while it makes setting inputs easier, it also means you can't set the resolution any higher, which is not a good thing when it comes to print output. But we will get to that soon. . .
At this point let me throw you for another loop. Each device has it's own maximum resolution or pixel output settings. For example, a digital camera may only be able to produce 3.1 megapixels (or roughly 2048 x 1536 pixels). A printer may have a maximum resolution of 300 DPI. It can't print at a resolution any higher than that.
At this point it's worthwhile to think of a Photographic analogy. Your input device's resolution can be likened to the film grain on your film negative, and your output device can be likened to the paper grain that the negative will produce when run through the darkroom enlarger. The trick is to produce an image from your input device (ie: camera or scanner) that is high enough, but no higher than that of your output device (ie: your printer or the computer monitor if we are talking about a web page for example). Anything higher than the output device resolution would be a waste of space and produce a file that is needlessly large.
The one saving grace in all this is that if you are outputting to the computer screen (in other words, web or CD output that is not printed), you can always keep your resolution set at 72 pixels per inch. Why? because, while some rare monitors can view files at 85 and 92 pixels per inch, most every monitor outputs the image at 72 pixels per inch. This is standard across almost every monitor on the face of the planet. Thank God for small miracles.
So now let's get to the heart of the matter. Say you are a digital Photographer and want to shoot an image for BOTH print and the Web, and you already know this image has to be displayed 4 inches tall by 6 inches wide. How in the world do you get it into the computer and make it look good for both On-screen and print display. And what settings do you use?
The short answer is this: digital cameras were built to be a digital medium. They were not built to be used for the Print world. Therefore most digital cameras on the market today are built around the idea that your end result is going to be an image for the web or screen. Only recently have digital cameras been built to produce higher and better quality images for print. So just keep in the back of your mind that while you can use digicams for images to be printed, you are still trying to fit the square peg in the round hole. Digital cameras will not produce an image beyond 72 pixels per inch. And most will use JPEG (compressed) or TIFF (uncompressed) image file formats. When you compress an image, you lose image quality, not resolution. However, you want to maintain as much quality as you can, so my advice in this situation is to shoot for the higher TIFF uncompressed image. This will give you the best quality. Though we're still faced with the fact that the image is 72 pixels per inch, because that's all the camera can take. It can't go any higher.
So let's take a step by step approach to figuring out what we need to do.
Shooting for On-Screen Images
Since we know that all monitors see images at 72 pixels per inch, we know that this is the least of our worries. Shooting at any option on our digital cameras will produce a 1 to 1 relationship between the pixels being shot and the size of the image on-screen or over the web. What you see is what you get. Furthermore, since most digital cameras were built for on-screen images, their resolution is already set for you: you guessed it. . . 72 pixels per inch. When you set up the shot to be taken on the camera, the size you specify in pixel dimensions will have a 1 to 1 relationship with what you see on-screen. If you want to know the dimension of the image in inches, simply divide the total amount of pixels in the length and width by 72. This will give you the appropriate dimensions.
However we are still faced with one issue when it comes to screen resolution. A monitor is an output device, and as we said, output devices have their own resolution settings. If you go into the display properties of your screen, we notice you can change them to be 800x600, 1024x768 or in some cases if you are used to squinting at icons on your screen: 1152x864 pixel width and height. Notice when you shift the settings to the higher pixel values, everything on your screen becomes smaller. Why is that? Well it's because you are telling your computer to squeeze in more pixels every inch. But since the program icons, GUIs (Graphical User Interfaces), and everything on your screen is still the same pixel size, it looks as if the images are smaller. More Resolution = greater detail = smaller image dimensions (in Inches).
So even though you create your image to be a specific size, keep in mind the user can always alter their output device, and effectively "change" the way your image is displayed on their screen. My advice is to set up your monitor to be the size that you feel fits best for the majority of your user's screen resolutions. No easy task, seeing as how it's hard to predict what screen resolution the user is viewing. Rest assured though, that the majority of users are still viewing at either 800x600 or 1024x768 screen resolutions. So shoot for these sizes and you will be fine. To gauge the size of your image, do the following:
Step 1
Set up your screen resolution to match the size you want (I usually try to make my websites for the lowest common denominator, which is 800x600 for screen output).
Step 2
Next, open Photoshop, and create a new image (File -> New)
Step 3
Set up your dimensions for the file size to be the same size image as your entire screen (800 width and 600 height for example). Be sure the resolution is set to 72 pixels per inch. Then click the OK button.
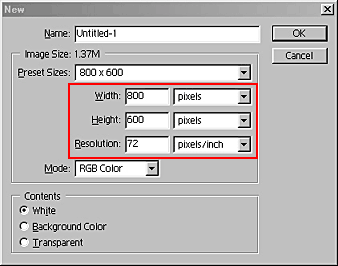
Step 4
You now have a relative 1 to 1 ratio of image size, and you can think of this image as your entire computer screen (great for storyboarding by the way). Also note one important point: users will be viewing your page in a browser if your delivery method is the web, you have to account for the space that will be taken up by their browser's menu, toolbar, status bar, and even a search or history pane that could potentially be open in their browser. I usually draw a grid line along the top, bottom, and left side of this dummy image in order to account for these browser elements.
Step 5
Make sure your zoom is set to 100% in your bottom status bar. This will ensure the size of the image window is exact, and what you are viewing in the window is the actual size the way your users will see the image. Remember that this view percentage only affects how you are viewing the image within photoshop, and does not have any bearing on the dimensions of the image file. They are 2 different things.
The Screen View works much like the View feature in MS Word, or when you view an Adobe Acrobat document. It sizes the image within Photoshop. This is NOT the actual image dimensions. The Zoom percentage is found in your status bar on the lower left side of your application.
Step 6
Next, select the full screen mode.

Step 7
Then select the marquee tool.

Step 8
Click on the Tab key on your keyboard.
Step 9
now all your toolbars and palettes are gone, feel free to draw in the square with your mouse to mimic the dimensions of the image you want. when you have the image in it's place on screen and you see the marching ants, click the tab key once again to bring your palettes back.
Step 10
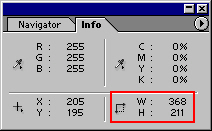
Go into your info palette (window -> info) and place your cursor anywhere inside the marquee square you drew. You now have the correct width and height for your image. When you shoot with the digital camera, you can shoot for the pixel dimensions that comes closest to the width and height of this marquee square. Be sure you select the size that is the next largest on the camera to your longest side (either width or height of your image). For instance, if the information tells you that the width is 368 width x 211 height, then shoot at 480 x 360.

The Cursor inside the marquee selection. Notice that the info palette on the left displays the exact width and height of your image.
This is where I have to interject again and clarify a point. Open the Image Size box in Photoshop (Image -> Image Size). Now if you have been following along to the above discussion, you will know and understand that once you have the image in your computer, if you then decide to change the resolution, the size of your image (in inches) will change to correspond. Resolution and Image dimensions are co-dependant. They act in conjunction with one another. Change one, and the other will change accordingly.
So why is it that when you change the resolution in this box (and go ahead and try it yourselves), nothing is happening to the image size? Has Photoshop taken a complete vacation from the laws of physics? Told reality to take a hike? Well in a way it has. When you change the resolution in Photoshop, you are telling the program to compensate for the resolution change and give you the same image dimensions. Photoshop essentially favors the image size, and will maintain that image size by default. How does it do it? If you sample upward (upsampling), Photoshop will add in pixels (somewhat) arbitrarily to accomodate for the missing pixels. The program is adding pixels where there were no pixels before, and Resampling upward is akin to telling Photoshop to make up bogus pixels and shove them into these empty pixel spaces. While Photoshop can do a good job of guessing what these pixels will be, it can never provide you with proper detail nor color. It is "guessing" for you. And you end up with a blurry blotchy image that suffers from jagged edges (this is known as pixelation, and it's not pretty). Take it one step further and if you click the save button at this point, your original image that took you 2 hours to set up placing lights and props and getting everything just right is gone forever. Because you have just saved the image with "guessed" (aka bogus) pixels over the original. And there is NO going back now. It's lost forever.
The main rule here is to be VERY VERY careful when sizing your image upward. The correct way to upsample is described below in the steps to prepare your image for print.
If you resample downward (downsampling), Photoshop is reversing this process and has to cut out pixels to make up for less space. However, unlike upsampling, downsampling is less dangerous and doesn't result in a loss of detail (or at least the loss of detail is quite imperceptible because as an image gets smaller, less detail is necessary and the tones generally sharpen). Downsampling is generally an acceptable way to resize your image.
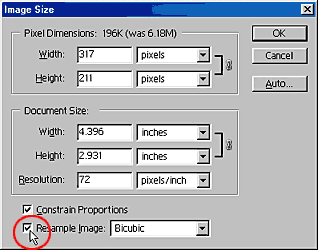
If you are a purist however, and never want to downsample or upsample under any circumstances, you can tell Photoshop to adhere to the laws of physics and deselect the "Resample Image" checkbox. This forces Photoshop to conform to the laws of reality and your image will not lose one iota of pixel information, nor will there be any new pixel guessing games (no new pixels added). It then also follows that if you deselect this checkbox, as soon as you change your resolution, the image size will change accordingly. This can be a frustrating thing, unless you plan ahead and take into account what exact resolution and size you will need well ahead of shooting or scanning the image.
Photoshop working against the laws of reality by default. Photoshop will take a best guess at inserting or cutting pixels within your image, chopping up and creating a veritable mish-mash of your image.
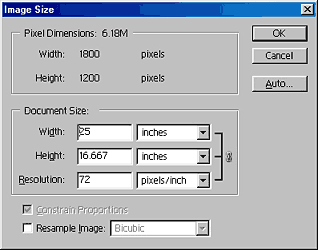
Below, Photoshop working with the laws of nature. All original image pixels / data will remain untouched, however, at the cost of image size. Notice how the lock ties the image dimensions to the resolution. Forcing Photoshop to stop resampling the image ties these two worlds together again.
Shooting for Printed Images
Now let's get back to our original example. We need a photo that is 4 inches high by 6 inches wide. We've taken care of the method for getting it on-screen, but now if we print our image it comes out pixelated, meaning the pixels are noticeable. Why is that? It's because the naked eye can see differences in pixels that are below 150 dots per inch when printed, and we are printing an image that is 72 pixels per inch, way below the cutoff (incidentally this is an arbitrary marker -- 150 pixels per inch -- however it is generally accepted that anything below this marker will be noticed by the naked eye).
But if the camera shoots at 72 pixels per inch, and our printer output needs to be higher than 150 pixels per inch, what are we to do?
Simple.... follow these steps and you are all set:
Step 1
First figure out what the highest capability of your output device is (for most printers 300dpi is the maximum output, but it can be much higher). Let's say our printer could only output 200 DPI. If this were the case, then we have one part of the equation figured out. We know not to shoot the image at anything above 200 DPI. Though usually you will not have to worry about the resolution setting of the printer (most printer's these days will print well over 300 DPI), it is still good to understand why your output device resolution is important.
Step 2
Go into Photoshop and go to File -> New. In this way we are going to let photoshop calculate the proper pixel size for us, instead of doing the formula ourselves. Who ever liked formulas in school anyway?
Step 3
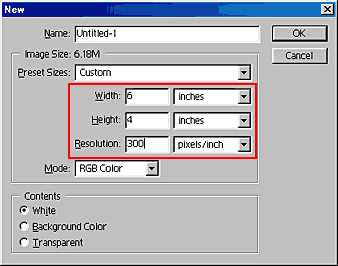
In the dialog box that opens, change the measurement to inches for the width and height, and enter in "6" for the width and "4" for the height.
Step 4
Next, enter 300 for the resolution (assuming that's the highest quality level of your printer). Then click OK. You should end up with a dialog box like the one listed below:
Step 5
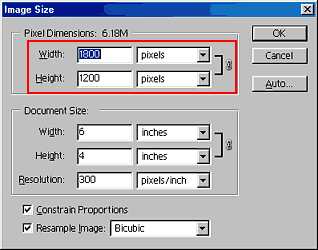
you now have your blank image screen. For the next step, go into Image -> size, and voila. you now have your pixel dimensions. If you did everything correctly, you should see that we need to set our input device (digital camera) to 1800 pixels wide x 1200 pixels high.
Step 6
The same rules as applied to the screen image apply to the print image. Set up your camera to be the next size up from the longest side, in this case the next step up from the 1800 pixel width (on most cameras this will be the 2048 x 1536 pixel setting). Then shoot your image.
Step 7
When you import the image into Photoshop, go into the Edit -> Image Size dialog box, uncheck the "Resample Image" checkbox, and then change your resolution to 300. Always remember that when sizing the image upward, you should ALWAYS uncheck this box first. When sizing downward, you can uncheck it or keep it checked. The choice is yours.
So now we have an image that is usable for print and the web. Keep a master copy of the image at full size for your original, and size it down for the web by changing the resolution from 300 to 72 pixels per inch. It will be resampled downward and maintain the same dimension or image size in inches. If you want to resize the image slightly downward to fit the proper dimensions we specified for print purposes (4x6 inches), then enter the appropriate size (in inches) for the width and height in the Image Size box. Just be sure to use the File -> "Save As" dialog to save a separate copy from your master..... in case you ever need to go back to the original file size and original image later.
And for those purists out there, you can uncheck the "Resample Image" checkbox, and change your resolution without changing the pixel (image) data. Just remember that when you do this, you are going to sacrifice the image dimensions (in inches), and you will end up with a smaller image than your original.
To recap let's look at the basic principles of what we've learned in this tutorial:
- You can divide up all computer devices into input (scanner, digital camera) and output (printer,
monitor) and each of these devices has their own unique resolution settings.
You set up the input device to capture the amount of pixels by setting
either the pixel dimensions and resolution (camera), or the resolution
and image dimensions in inches (scanner). The image resolution is interdependant
with the dimensions (size in inches) of your image.
- Increasing Resolution = More detail = Smaller Image dimensions (in Inches). The reverse of this
is true as well. Decreasing Resolution = Less detail = Larger Image dimensions
(in inches).
- For Web/CD images: Resolution is always 72 Pixels per Inch. The pixel
dimensions will be a 1 to 1 ratio between what you are shooting on the
camera versus what will display on-screen. Determine the size image you
need in pixels via Photoshop and shoot the image by selecting the next
size up (in pixels) on your camera settings. If you have a choice for
setting image quality for the same pixel dimensions, always select the
higher quality setting.
- For Print images: Determine the Printer's highest resolution setting.
Always attempt to shoot for the highest resolution that the printer can
output. Barring this, a general rule of thumb is to use the 300 Pixel
per inch resolution setting. If you can't set resolution on the camera,
then go into photoshop and create a "dummy image" with the correct
size (in inches) and projected resolution setting (usually 300 PPI), then
look to see the Pixel Dimensions of this new "dummy image" in
the "Image Size" dialog box, and select the next size up (in
pixels) on your camera settings. If you find that the camera cannot produce
the amount of pixels Photoshop has specified, then select the highest
setting, as well as the highest image quality setting (if applicable).
- For Print and Web images: Always shoot for the Print, and resize a
copy of the original down for the web. After the image is shot, you can
size the image down (downsampling) And when in doubt it is always better
to deselect the "Resample Image" checkbox under the Image ->
Image Size dialog box. Be aware, however that the dimensions of your image
will change to match the change in resolution.
- I'll repeat it once again because this is the most important point of this whole discussion: Upsampling is BAD. VERY BAD. DO NOT DO IT UNDER ANY CIRCUMSTANCES.